
S2, E7: Grafting ...
- Katherine

- May 8, 2021
- 3 min read
Updated: Jul 28, 2021

Today we visited the apiary as a spur-of-the-moment decision on the way back from my wedding dress fitting (I'm not excited! You're excited!) as the rain had stopped and Greg was getting desperate. Unfortunately, we only had time to manage Laura before the heavens threatened to open again. Maybe we'll do Kate tomorrow - weather depending.
That being said, today was quite exciting. We went in to check for queen cells as there were quite a few last time Greg checked (19! But none charged). We didn't see any this time, which is good, but saw Laura almost immediately! As she was heaving with brood and bees we quickly made the decision to do our split then and there to make a 'queen rearing nuc'.
A queen rearing nuc is a queenless hive full of young bees. It is predominantly used to produce lots of queen cells. Generally, these are deliberately kept queenless and continue to rear queens throughout the season. We don't intend to do this, rather we are having a go as an experiment because Greg is incorrigible!
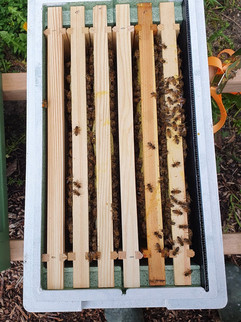
This is where grafting came in! First, we prepared the nuc with 2 frames of mostly capped brood (so that this increases the number of nurse bees in the nuc who have never known anything but the nuc as their home so they'll claim it as their own hive) as well as 2 frames of stores with both pollen and nectar (the nectar is food for the bees and the pollen is for the larvae). We then packed it with as many nurse bees as we could fit in by shaking frames from Laura into the nuc. Once that was prepared we shut it up and took a pre-chosen frame of newly hatched larvae (3-4 days old) to the warm car to graft. This time gives the flying bees chance to return to Laura. Leaving only young nurse bees behind.
Grafting involved taking a Chinese grafting tool (see my hand below) and trying to slip it beneath a larva, without scraping it against the cell wall - damaging the larva in the process. You then gently lift it out, on the tip of the tool and place it in the plastic queen cups (see the blue cups in the second picture below). It's more difficult and fiddly than you might think - a bit like threading a needle. We smooshed the comb a bit to make the larvae easier to see and to access. The bees should repair the damage we did to the comb within days and any brood should still survive as we made sure the car was warm.

We managed to do 5 grafts each with minimal bickering - well done us? Greg insisted that I included in this post that his were the ones marked by the blue queen pen - due to our healthy competitive nature - we'll see who's victorious in two days time!

Finally, we took the queen cup bar and placed it in a specially cut frame in the centre of the nuc, making sure that the pollen was facing it so that the nurse bees can chew it up and give it to the larvae more easily.


By this point, no more bees were flying so we didn't get to Kate before the weather took a dark turn (see brooding clouds below!) Greg will probably visit tomorrow to feed and check on any queen cells in Kate. If there are any we may make another nuc ... Greg's really keen to have 8 hives by the end of the year ... I'm really keen to have lots of honey. It's a constant battle of wills but the bees will be the ones to decide in the end.
Until next time ... TTFN


Comments